Orange Bright Spots Using Again the Brush Tool in Photoshop
If you want to empathize how to mask layers in Photoshop, then you demand to become very friendly with your brush tool. Information technology allows you to depict over the verbal areas you lot want to use an adjustment to…or rather, the areas where you desire that particular layer to be visible or invisible.
Information technology'south a VERY powerful tool, and a crucial part of layer masking…especially for photographers.
And since layer masks are part of a non-destructive workflow, yous tin always come back and alter your adjustment at whatever time past but applying new brushwork to the layer mask.
So for this comprehensive Photoshop tutorial, I'll exist showing you exactly how to utilise your brush tool to refine a layer mask so that information technology compliments the unique content of your epitome. Your ability to dictate where a layer should (and should non) be visible is cardinal to creating a professional person, wall-worthy photo.
Now if you're a Lightroom user, the brush tool volition be familiar equally it works a lot similar the aligning brush…specifically how you can change the brush size, opacity, and feathering.
However, in Photoshop the castor tool is not loaded with an actual aligning like information technology is in Lightroom. Instead, the layer itself volition comprise the adjustment, and we use the brush tool in combination with a layer mask to control where the aligning is applied.
If you adopt to learn visually (which I highly recommend for annihilation Photoshop), you tin can download my gratuitous video course below. This v-part course as well comes with practise files and a helpful PDF cheatsheet, so you can become hands-on with layers right away.
Tabular array of Contents
- Video Lesson: How to Use the Brush Tool with Layer Masks
- Castor Tool Basics
- How to Brush Onto a Layer Mask
- Mask Reversal: How to Erase Your Masking with the Castor Tool
- Adjusting Your Castor Hardness
- Tailoring a Layer Mask
- Using a Gradient on a Layer Mask
Sentry the Full Video Lesson Below
The brush tool is best learned when taught visually, so I've pulled a comprehensive video lesson from my membership plan for you lot to watch. Even so, a video is not ever the most convenient mode to acquire, and so I'chiliad besides including the total written tutorial below.
To access your castor tool, simply printing B or go over to your tools palette and select the brush tool from in that location. Y'all tin tell when the brush tool has been activated as your meridian menu will present options for customizing your castor tool.
To conform the size of your castor, press the [ or ] subclass keys to increase and decrease your brush size. You'll be doing this often so it's good to familiarize yourself with these keyboard shortcuts.
The size of your brush is labeled by pixel count (i.e. 1200 px), and then the area your brush affects is in directly relation to how many pixels your photo contains. This is why I like to just use my bracket keys to "eyeball" the brush size instead of trying to hit a specific number (i.due east. 1200 px).
Brush opacity is something yous'll adjust often, then information technology's helpful to know the keyboard shortcuts for this as well. At the peak carte, you can suit the opacity slider, but I find it easier to enter the opacity level with my keyboard. Much like in Lightroom, if y'all enter the number one your opacity volition alter to 10%, 2 for 20%, and so on. Pressing 0 will revert back to 100% opacity.
If you lot want a specific opacity level, printing the numbers very chop-chop. For example, if y'all desire to utilise a castor at 27% opacity, printing 2 and 7 chop-chop…otherwise, it will change to xx% and then seventy%.
The colour of your brush is controlled by the foreground color swatch in your tools palette. Since nosotros're working with masks, your swatch should always be in greyscale…which means this swatch should be loaded with white, black, or a shade of gray.
Brushing onto a Layer Mask
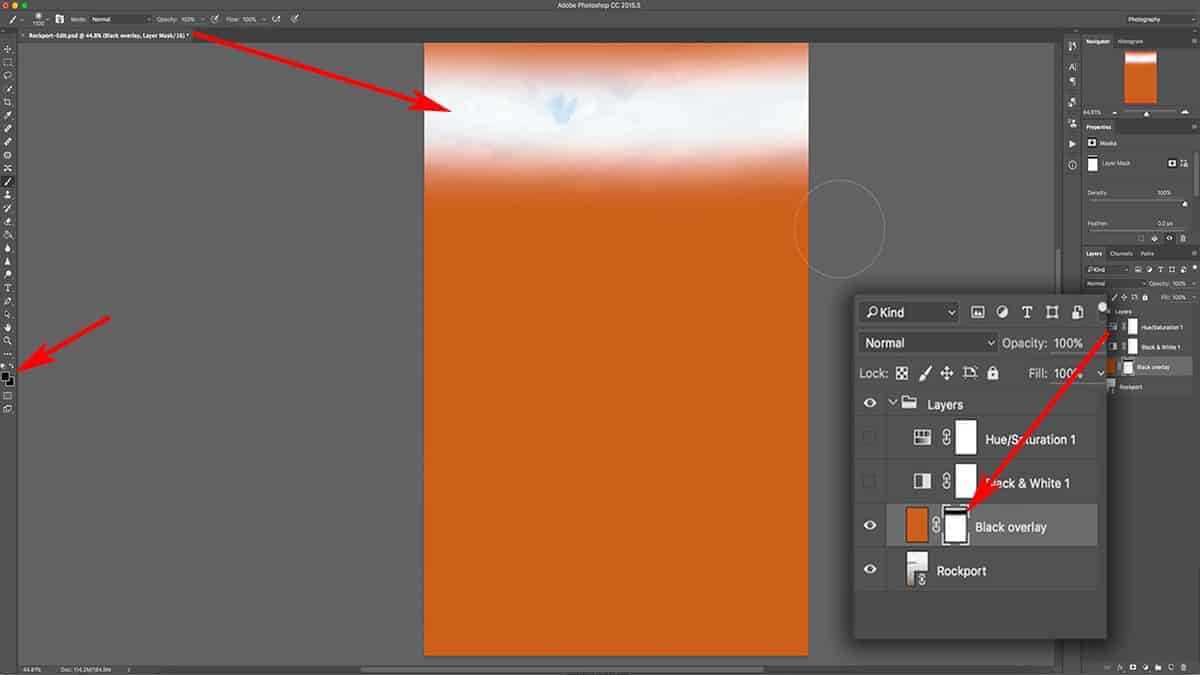
First, press B to actuate your brush tool and gear up your opacity to 100% by pressing 0. Then, brand sure the layer mask is filled with 100% white and applied to the orange make full layer we created in the previous tutorial on layer masks.
Select the mask past clicking on the mask thumbnail, then make certain your foreground color is gear up to black past pressing D as in Default. This volition set your foreground color to blackness and background colour to white.
Click and drag your mouse across the top of your epitome once, which will brush a strip of black onto your layer mask. This will render the surface area transparent then you tin can see the photograph underneath.
Since we are using a layer mask, this "hole" we created with the brush tool is temporary; we can e'er revisit this mask and add more blackness, white, or grey to information technology to change the transparency…or delete the layer mask altogether in order to bring back the orangish fill layer in full.
Let'south practise that right now. Change the opacity of your brush tool to l% past pressing 5, and practice the aforementioned thing again: click and drag your castor tool across the photo (making sure the layer mask is yet selected).
The overall outcome is still the same: we're changing the transparency of the top layer so we tin run into more of the layer(southward) underneath, but since we are using 50% opacity and not pure black, we are only removing 50% of the orange fill layer.

Let's do this one more than time, but with 25% opacity. Printing "2" and "five" rapidly to set your brush opacity to 25%, and click and drag across the lesser of the photo, making certain you are painting onto the layer mask.
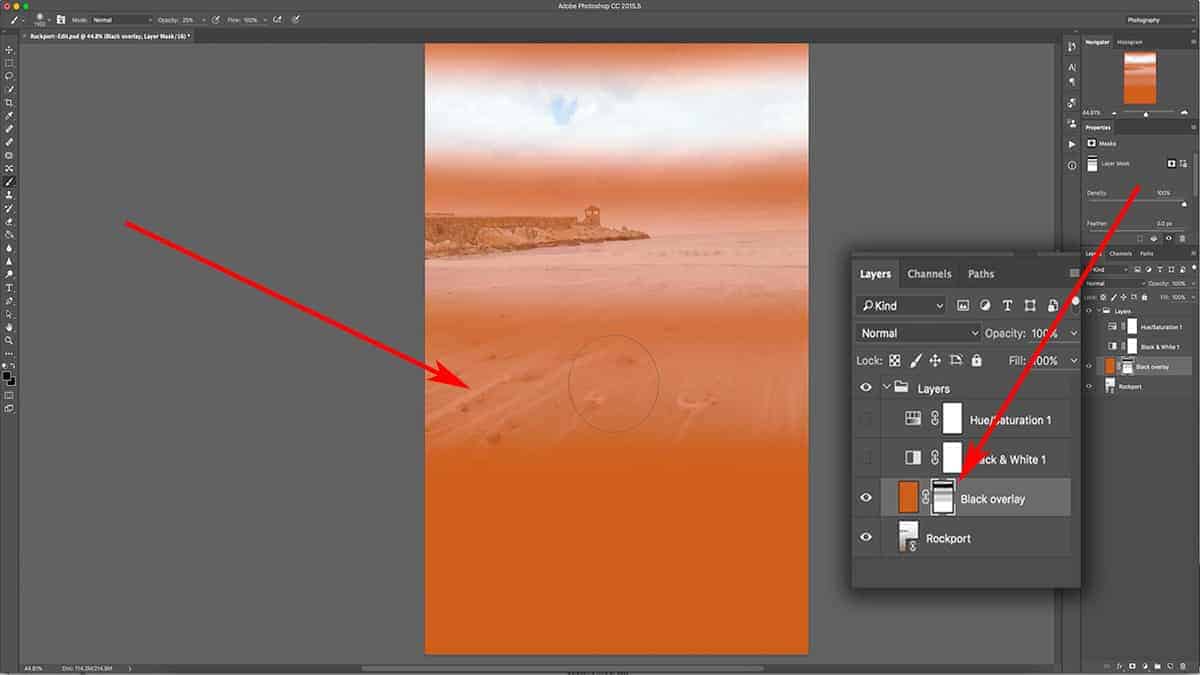
Once again, the effect is still credible, but at a much lower opacity; we can now run across more than of the orangish make full layer than the photo layer underneath since nosotros are painting 25% gray on the layer mask. This shade of grey is 25% darker than pure white….which translates to only 25% of the underlying layer being visible.
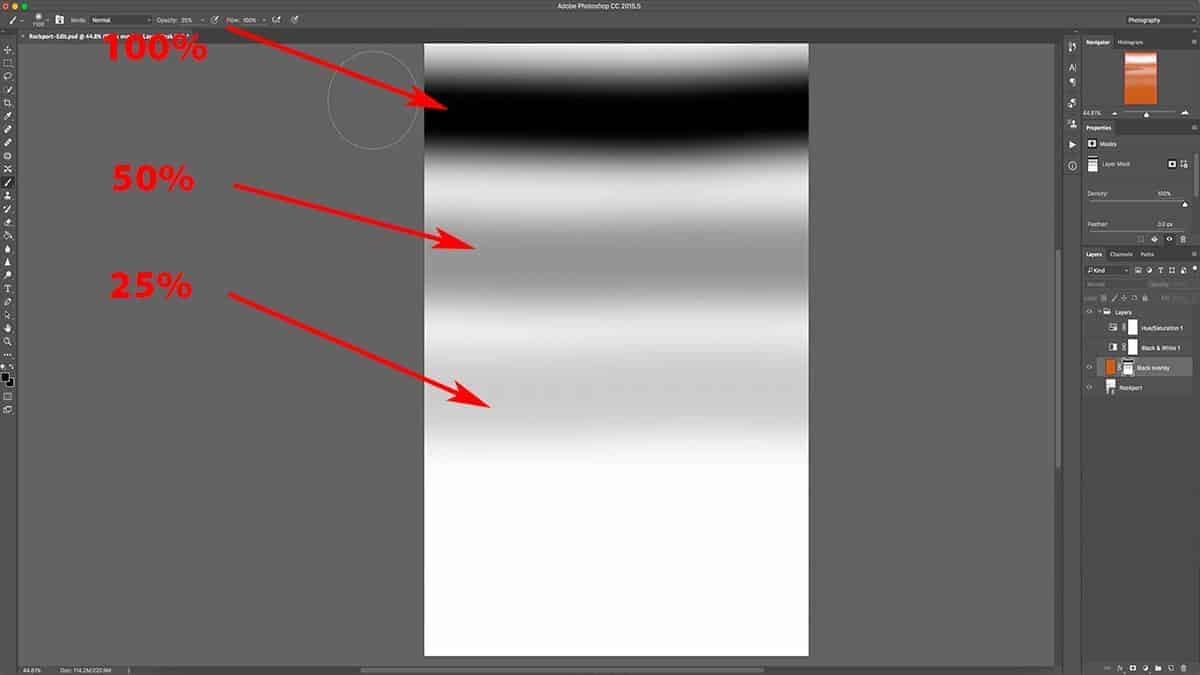
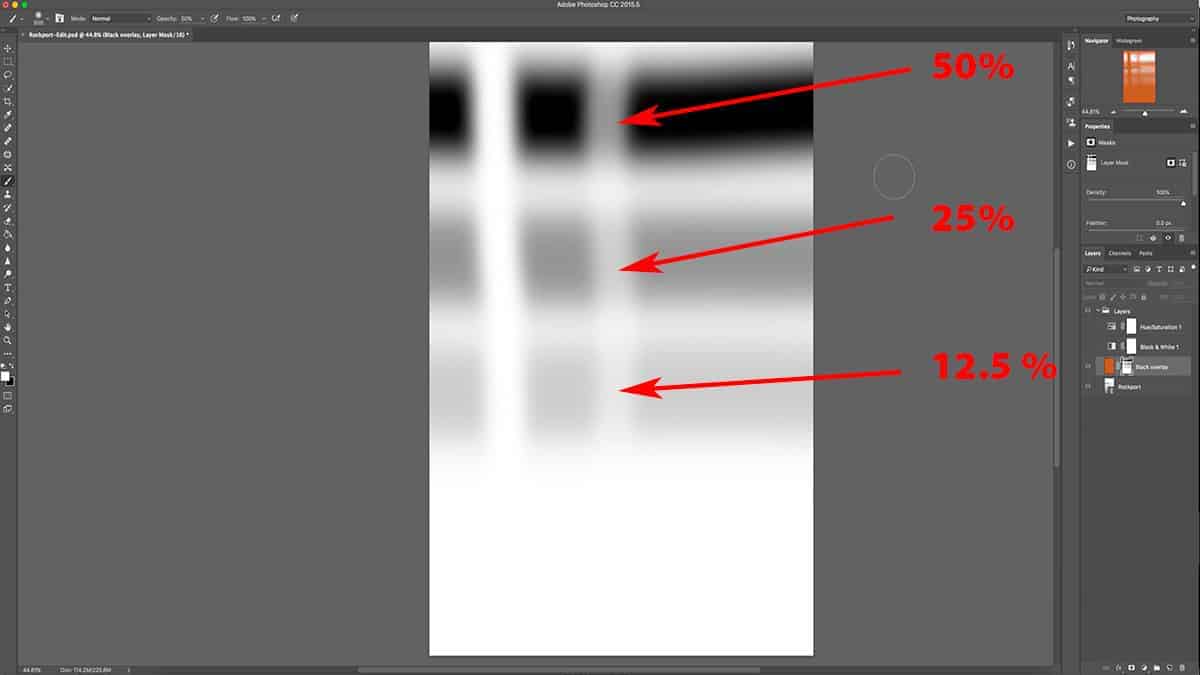
At present allow'due south take a await at the layer mask then we can better visualize how this all works. The start line we drew is 100% black, the 2nd line is 50% grey (or 50% transparent) and finally, the 3rd line is 25% grey (which makes our layer but 25% transparent).
So in order to accommodate the opacity of your layer, you need to suit the opacity of your brush tool. Since it'due south loaded with 100% black, changing the opacity of that blackness will command what shade of gray is painted onto your layer mask. Applying a brush stroke with 50% opacity is identical to choosing 50% greyness in your colour picker tool.
Yous could employ your color picker tool to choose a shade of grayness and use that at total castor opacity, but that's a convoluted manner to pigment onto a mask. Information technology's much easier to just change the opacity of a castor loaded with pure black.
Reversing Parts of a Layer Mask
So far, we've but discussed how to add black and grey to a layer mask in order to change the transparency of a layer. We've too discussed how to remove a layer mask as a whole. Just how do we reverse our masking for only specific parts of a layer mask? In other words, how do we smoothen a lite back onto areas we've made transparent; to contrary what we just did and make that orange layer more than visible over again?
All yous need to do is add white (or light) back to this layer mask with a white brush. This is one of the best traits of layer mask…being able to switch back and along from adding blackness and white until you find the correct balance between your layers. Yous'll be using this a lot, especially with landscape photography.
First, let's load the brush with white by pressing X, which will switch your foreground and background colors. You may need to press D first to load your foreground/groundwork swatches with black and white, and then printing Ten to switch them. Make sure your opacity is back to 100% past pressing 0.
Make sure your layer mask is selected, and and so depict a white line directly down the canvas.
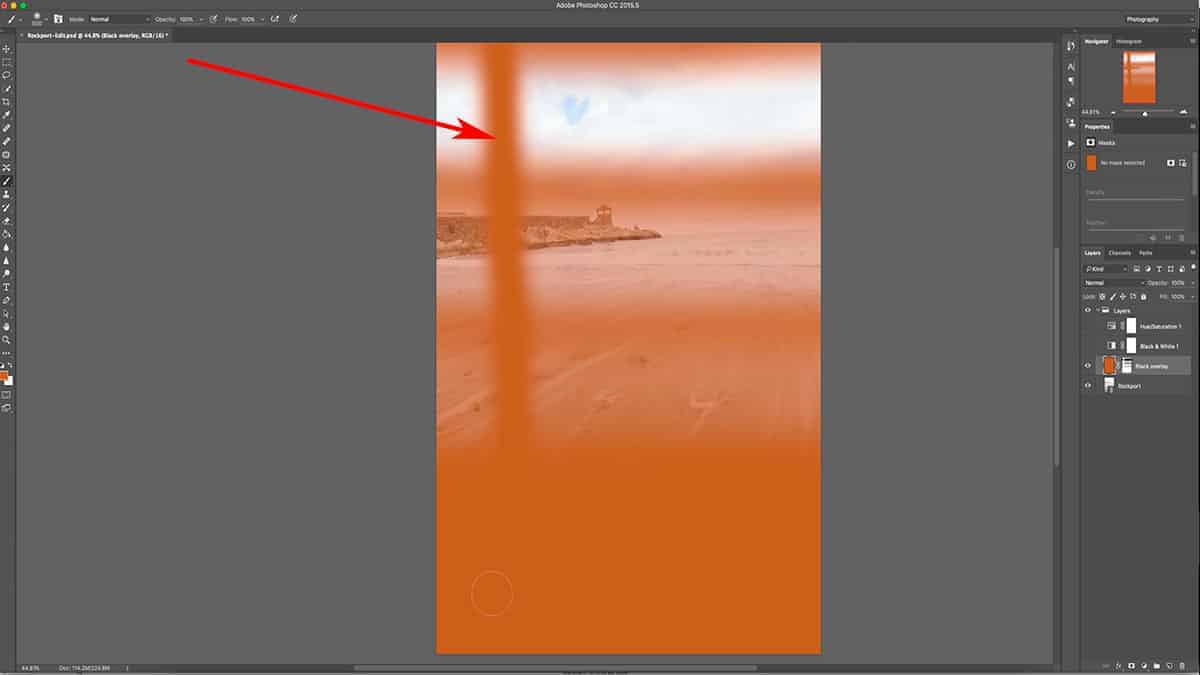
Since the opposite of black is white, adding white to an existing layer mask is just like using the eraser tool; it's reversing whatever masking y'all practical, but only to the areas you are brushing…which makes it very easy to correct whatsoever sloppy brushwork.
If you lot look at the bodily layer once again, y'all can encounter that the orangish has been brought back at 100% opacity by adding this strip of white.
Since we are working with 100% white, our previous masking was removed in total, equally seen above. However, what happens if nosotros use a white brush at a lower opacity to remove our masking?
Let'due south demonstrate this so you tin can visualize how a lower opacity effects an existing mask. Bring upward the layer mask by alt + clicking on the mask thumbnail in the layers palette, and adjust the opacity of our castor tool downward to 50%.
Once over again, castor downwardly on the layer mask, making sure to cantankerous over the black and greyness horizontal lines that nosotros created in the previous step.
The opacity of your brush direct correlates to strength. Since we are using a white brush set at 50% opacity, we are just working with 50% strength….which means we are only subtracting 50% of whatever we are brushing over.
The beginning horizontal black line was practical at total opacity. When we cross over this area with a white brush prepare at 50% opacity (or force), it leaves us with fifty% transparency.
The second horizontal blackness line was applied with 50% opacity. When we cross over that with a white castor set at 50% strength, we are subtracting l% from the existing 50%…and are left with only 25% transparency.
Finally, when nosotros cross our 3rd black horizontal line which was originally applied at 25% opacity, we are left with 12.v% transparency. In other words, we subtracted fifty% from 25%.
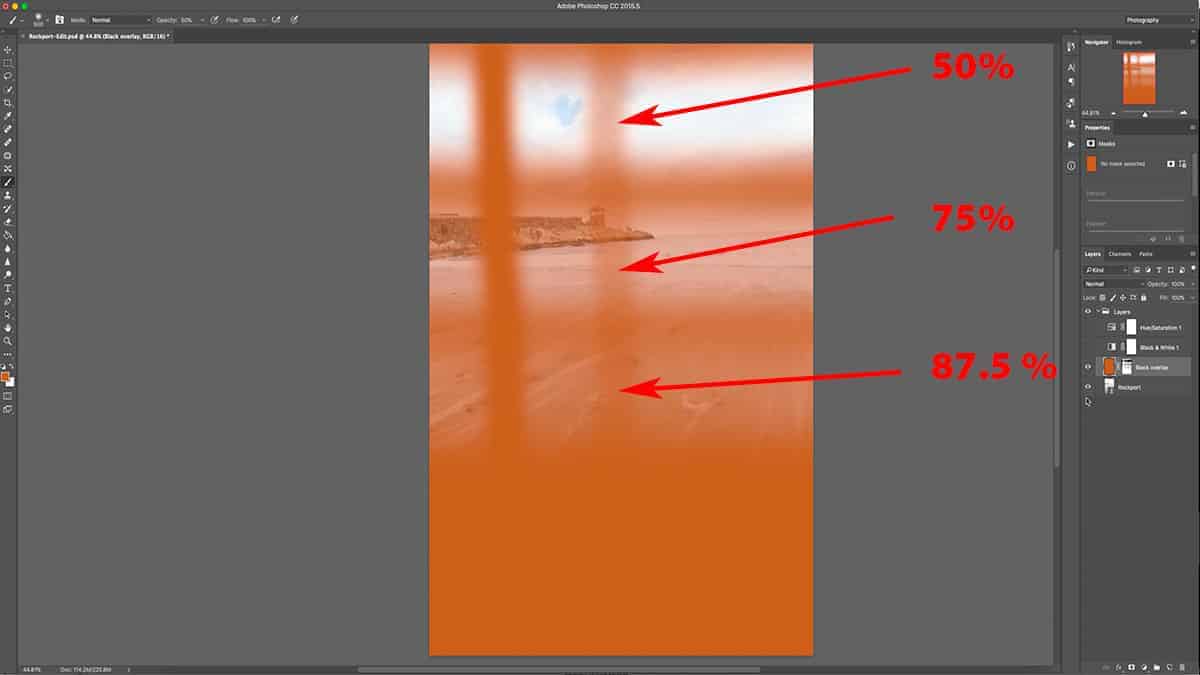
If we turn off the layer mask and await at the actual orangish make full layer, we tin can see that the aforementioned areas are now visible at l%, 75%, and 87.5% respectively.
Adjusting your Brush Hardness
When working with layer masks, usually your brush will be very soft and feathered because yous are working with 0% hardness…which gives you a nice tapered consequence to your masking. It's much like working with the aligning brush over in Lightroom, where y'all conform the feathering in social club to soften your transitions.
However, there could exist situations where you would desire a harder transition line…for masking out very specific areas.
With the brush tool selected, right-click anywhere on your canvas. A submenu volition come up assuasive yous to increase your brush hardness.
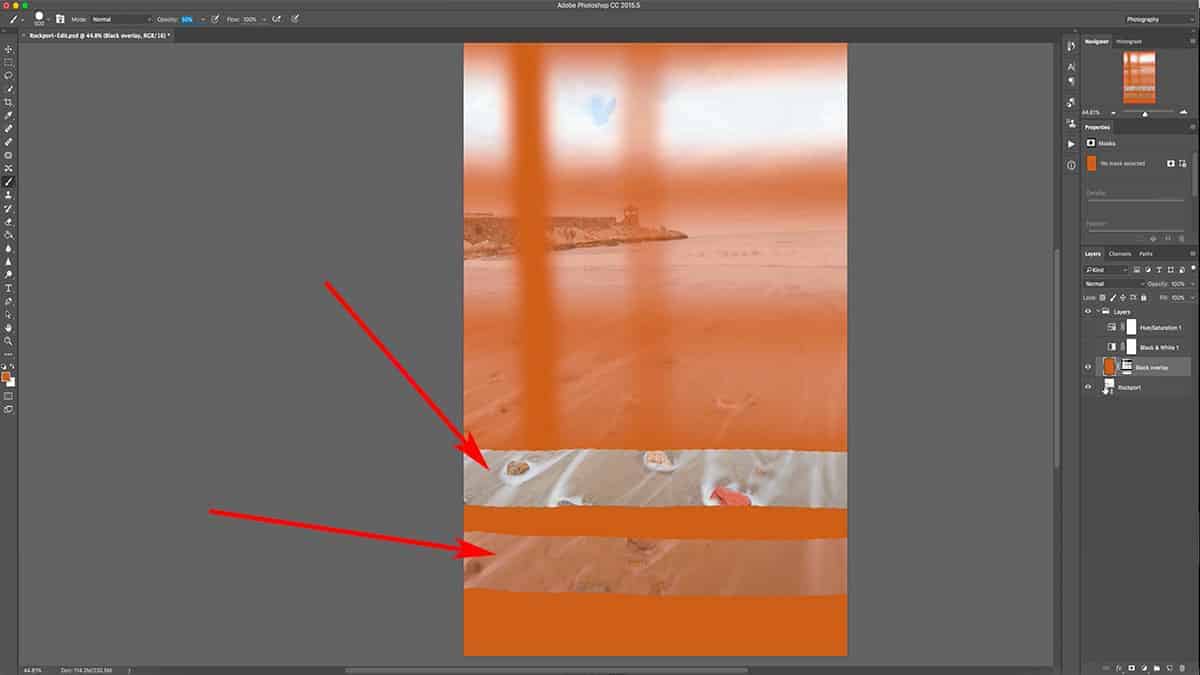
To demonstrate, I'll adjust my brush hardness to 100% and go back to the mask we've been working with. With my foreground colour gear up to black and opacity at 100%, I'k going to drag a line across the canvas. Yous tin see that the edge of my brushwork is very hard and divers, with no tapering at all.
For good measure, I'll also add a l% grey line past adjusting my brush opacity downwardly to l% and drawing another line beyond my canvas.
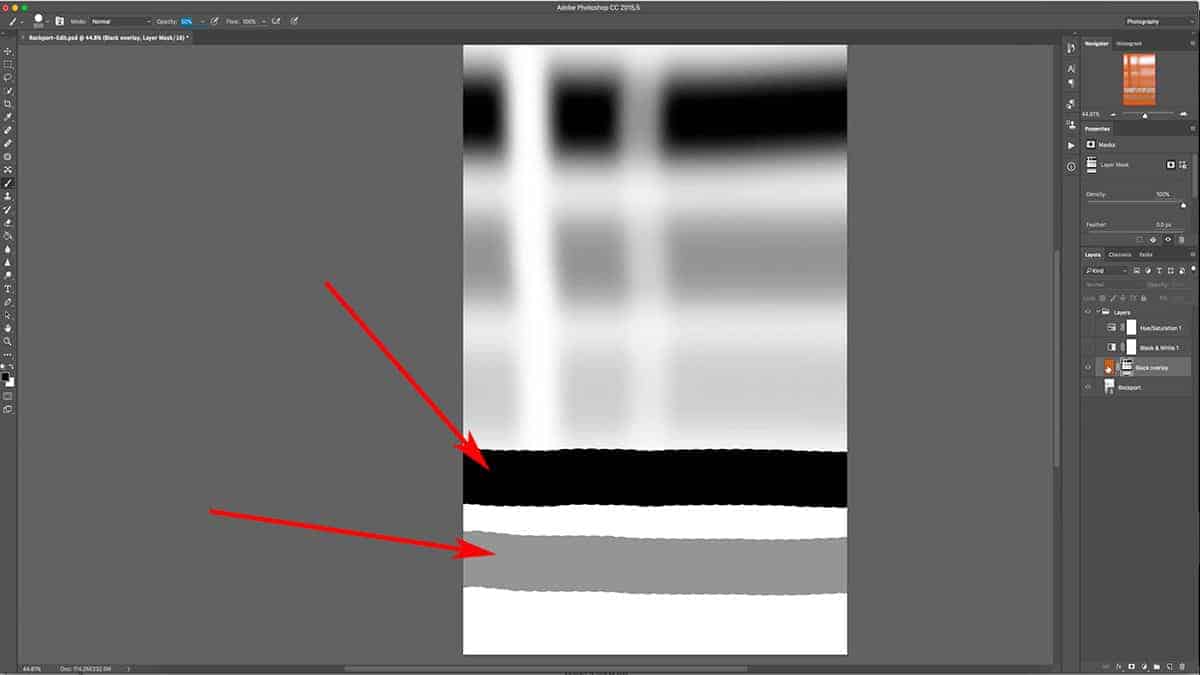
If we turn off the layer mask and take a await at the layer itself, you tin run into how sharp and sharp the transition is from the orange fill layer to the photo layer underneath.
Typically, you wouldn't use a hardness gear up at 100% similar this for tailoring an adjustment…but it tin can be useful when working with small and targeted areas.
I'chiliad going to zoom into this turret here and start masking along this very sharp, precise expanse. You lot can run across that my brushwork hugs the edge of this turret very closely. If I were to use a soft and feathered brush, the edges would spill over onto the sky.
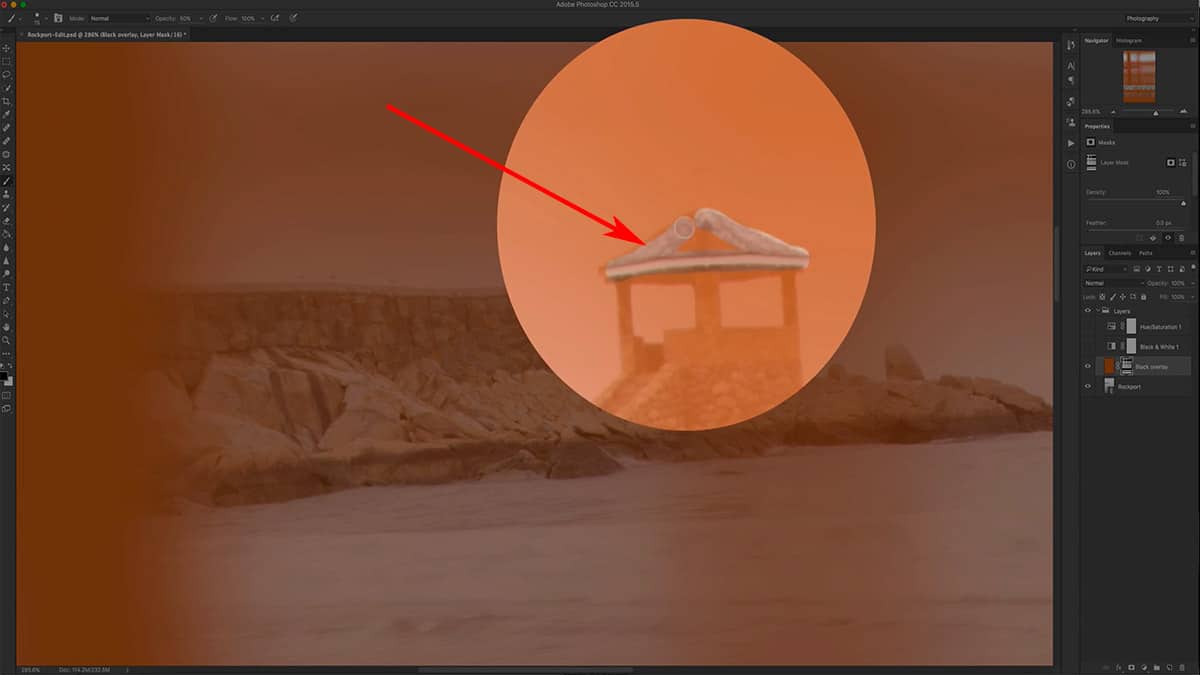
With this precise targeting I can make adjustments but to this turret and not to the background sky or other parts of my image.
By adjusting your brush size, opacity, color (either black or white), and hardness…you have the ability to tailor a layer mask with a very high degree of accuracy and forcefulness.
Tailoring a Layer Mask
Now it'south time to move out of our practice area and practise a "real globe" instance of how photographers utilize layer masks to tailor an adjustment.
Starting time, allow'southward temporarily hibernate this orange fill layer that we've been working with my clicking once on the eye to make it invisible.
Next, let's bring back the hue and saturation adjustment layer we added in the final tutorial. If you don't have that, simply add together your own and increase the saturation to 40%.
Every bit I mentioned before, this saturation bump looks good for about of the image except for the red rock in the foreground; it's a bit too heavy and distracting. To fix this, I'm going to mask out the rock by using my brush tool, which will ease up on the opacity – or the strength – of this saturation increment just around this expanse…while the rest of the prototype will retain the same saturation bump.
I could go in and brush over this surface area with a black castor fix at 100% opacity, but that would remove the saturation completely. Instead, I but desire to ease up on its effect.
To attain this, I'yard going to use a depression opacity brush which will remove but some of the saturation. Not only will this look more natural than removing it completely, only it will requite me more control over the saturation removal. If I'm not removing enough of the saturation with one brush stroke, I tin can simply brush over the area again and build upwards my brushwork until I get the upshot I desire.
Press B to activate the castor tool, and make sure your foreground colour is set to black and your hardness at 0%. Then, set your opacity to 20% by pressing 2, and just brush over the red rock once (making certain you lot are brushing onto the layer mask for the saturation adjustment layer).

This is just one application of my brush, and the results already look amend. I've scaled back on the saturation and brought back some detail in the rock that was blown out by the oversaturation.
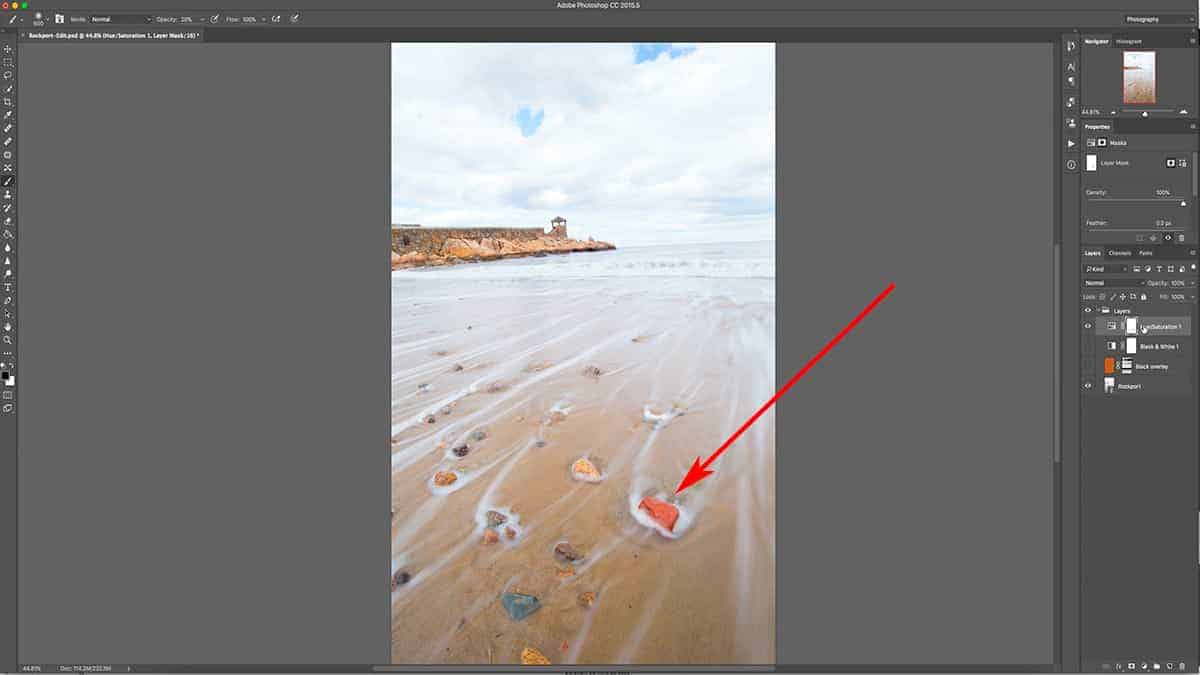
Withal, the rock is notwithstanding a scrap too saturated. Select the layer mask again and brush over this expanse over again to build up your brushwork and remove more saturation.
To run into a quick before and after of what this layer mask did to our prototype, but shift + click the layer mask thumbnail to temporarily disable it.
Using a Gradient on a Layer Mask
Tailoring a layer mask is not just express to your brush tool. You lot can utilize any Photoshop tool that creates a selection or allows y'all to paint a color.
A pop tool for layer masking is the gradient tool, which you tin can use to create a very soft and gradual transition betwixt pure black and pure white.
The feathering effect of a gradient is softer than what tin be accomplished with your castor tool, so I will sometimes apply this to alloy exposures together. The results expect much like a GND filter, but with more than control.
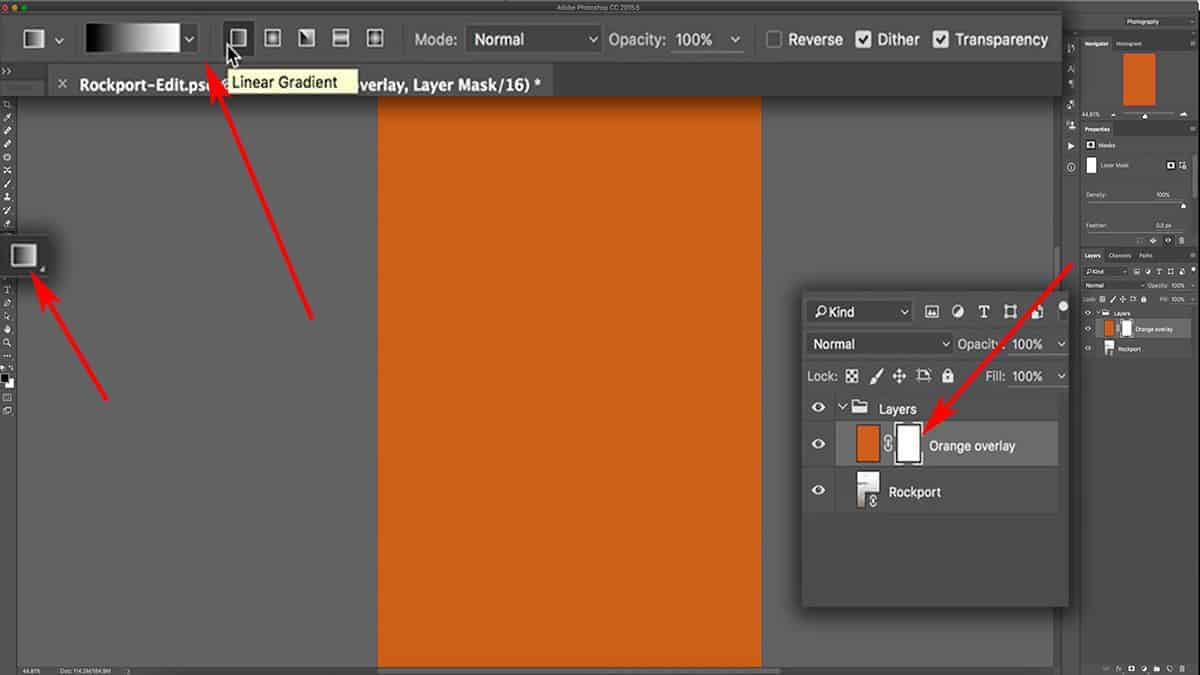
First, permit's delete our current layer mask so we are looking at the orange make full layer at full opacity…so add a fresh layer mask.
Next, select the gradient tool in your tools palette. It'southward usually hidden underneath the pigment bucket tool, so if information technology's not visible you may demand to right-click on the pigment bucket to bring it up.
Once y'all select the gradient tool, y'all'll notice that the acme menu will change to slope-specific options. These allow you lot to customize how your gradient will look…but for most situations, you'll want to continue these settings to how they appear in the screenshot below.
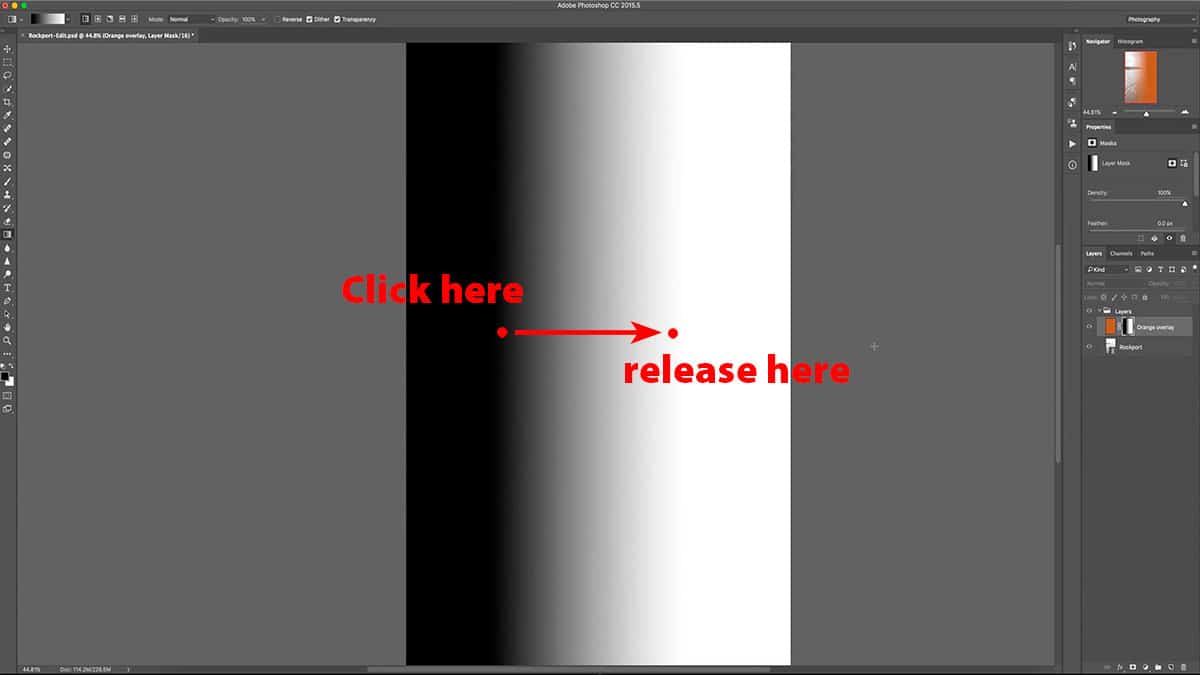
To add a gradient to your layer mask, offset make sure your mask is selected…and and then click and drag to stretch out a line in any direction across your sheet. For this paradigm, I dragged a horizontal line from the commencement point to the second point in the screenshot beneath.
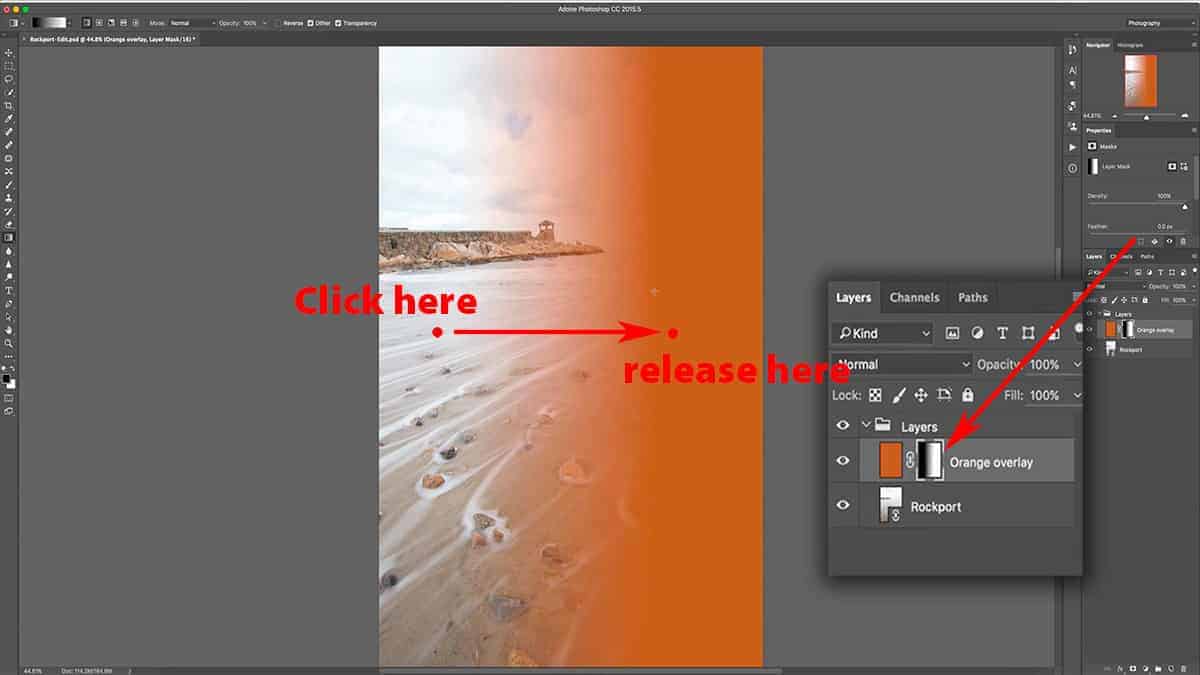
The line you draw volition dictate how broad the transition zone is between black and white, and will move in the management you draw. The longer the line, the larger (and more feathered) your transition zone will be.
If y'all desire to ensure that your gradient stays level, concur down the shift central which will go along your line completely horizontal or vertical. If you try to describe a diagonal gradient, it will restrict your line to a 45-degree angle.
For this prototype, I dragged my line horizontally from left to right…which ways that everything before the starting time point in the screenshot above (where I clicked) will be pure black, everything after the 2d point (where I released the mouse) will be pure white, and the area between these two points will become a gradient of black slowly transitioning into white.
Since the gradient was practical directly to a layer mask, this made the orangish fill layer slowly transition from being completely subconscious to 100% visible.
You tin see that the slope is very polish and evenly distributed, which would be very difficult to create with your brush tool. A gradient mask is perfect for whatever situation which requires very feathered and gradual masking, such as when you're trying to mimic a GND filter.
If you make a mistake drawing your gradient, you lot don't have to delete your layer mask to start again. Simply drag out a new gradient and Photoshop will automatically override and supercede your existing gradient with the new one.
The settings used here volition create a gradient that starts as blackness and ends every bit white, and moves in the direction you draw your line. If you want to reverse the direction of the gradient, merely tick the "Reverse" box located in your top card which volition invert the slope to instead transition from white to black.
The brush tool and gradients barely scratch the surface as to what is possible with layer masks. Depending on your desired result, at that place are much more efficient tools for tailoring a layer mask…so make sure to explore culling methods for drawing onto your mask (such as the marquee tools).
In landscape photography, luminosity masks are frequently used to instantly create layer masks that are completely tailored to the tonal value of your paradigm…which allows for you lot to brand adjustments to very targeted areas (for example, just the highlights in your clouds or reflections in the water). These are advanced selections which tin exist quite complicated to create, but there are gratis tools available that automate this process for you.
Don't forget…download your free class on Photoshop Layers for Photographers!
Orange Bright Spots Using Again the Brush Tool in Photoshop
Source: https://creativeraw.com/brush-tool-layer-masks-photoshop/
0 Response to "Orange Bright Spots Using Again the Brush Tool in Photoshop"
Post a Comment