How to Get Rid of the Attribute Blue Box in Android Studio
The Layout Inspector in Android Studio allows you to compare your app layout with blueprint mockups, display a magnified or 3D view of your app, and examine details of its layout at runtime. This is especially useful when your layout is built at runtime rather than entirely in XML and the layout is behaving unexpectedly.
Layout Validation allows y'all to simultaneously preview layouts on different devices and display configurations, including variable font sizes or user languages, making it easy to test for a variety of mutual layout problems.
Open up the Layout Inspector
To open the Layout Inspector, practise the following:
- Run your app on a connected device or emulator.
- Click Tools > Layout Inspector.
Equally shown in figure i, the Layout Inspector displays the following:
- Component Tree: The hierarchy of views in the layout.
- Layout Display: Rendering of app layout as it appears on your device or emulator, with layout bounds shown for each view.
- Layout Inspector toolbar: Tools for the Layout Inspector.
- Attributes: The layout attributes for the selected view.

Figure 1. The Layout Inspector.
Select a view
To select a view, click it in the Component Tree or the Layout Display. All of the layout attributes for the selected view appear in the Attributes panel.
If your layout includes overlapping views, you lot tin can select a view that is not in front by clicking information technology in the Component Tree or past rotating the layout and clicking the desired view.
Isolate a view
To work with complex layouts, you can isolate individual views then that only a subset of the layout is shown in the Component Tree and rendered in the Layout Display.
To isolate a view, right-click the view in the Component Tree and select Evidence Merely Subtree or Show Only Parents.
To return to the full view, right-click the view and select Show All.
To hide the bounding box or view labels for a layout element, click View Options ![]() at the top of the Layout Display and toggle Show Borders or Show View Characterization.
at the top of the Layout Display and toggle Show Borders or Show View Characterization.
Compare app layout to a reference paradigm overlay
To compare your app layout with a reference image, such equally a UI mockup, you tin can load a bitmap image overlay in the Layout Inspector.
Live Layout Inspector
The Alive Layout Inspector provides complete, real-time insights into your app'south UI while it'south deployed to a device or emulator running API level 29 or college.
To enable the Live Layout Inspector, get to File > Settings > Experimental, and bank check the box side by side to Enable Live Layout Inspector. So click the checkbox next to Live updates above the Layout Display.
The Alive Layout Inspector includes a dynamic layout hierarchy, updating the Component Tree and Layout Display every bit views on the device change.
In addition, the holding values resolution stack allows yous to investigate where a resources holding value originates in the source code and navigate to its location by following the hyperlinks in the properties pane.

Figure ii. Holding values in the Attributes panel with hyperlinks to the backdrop' definitions.
Lastly, the Layout Display features an avant-garde 3D visualization of your app's view hierarchy at runtime. To utilize this characteristic, in the Live Layout Inspector window simply click on the Layout and rotate information technology by dragging the mouse. To expand or contract the layers of the Layout, use the Layer Spacing slider.
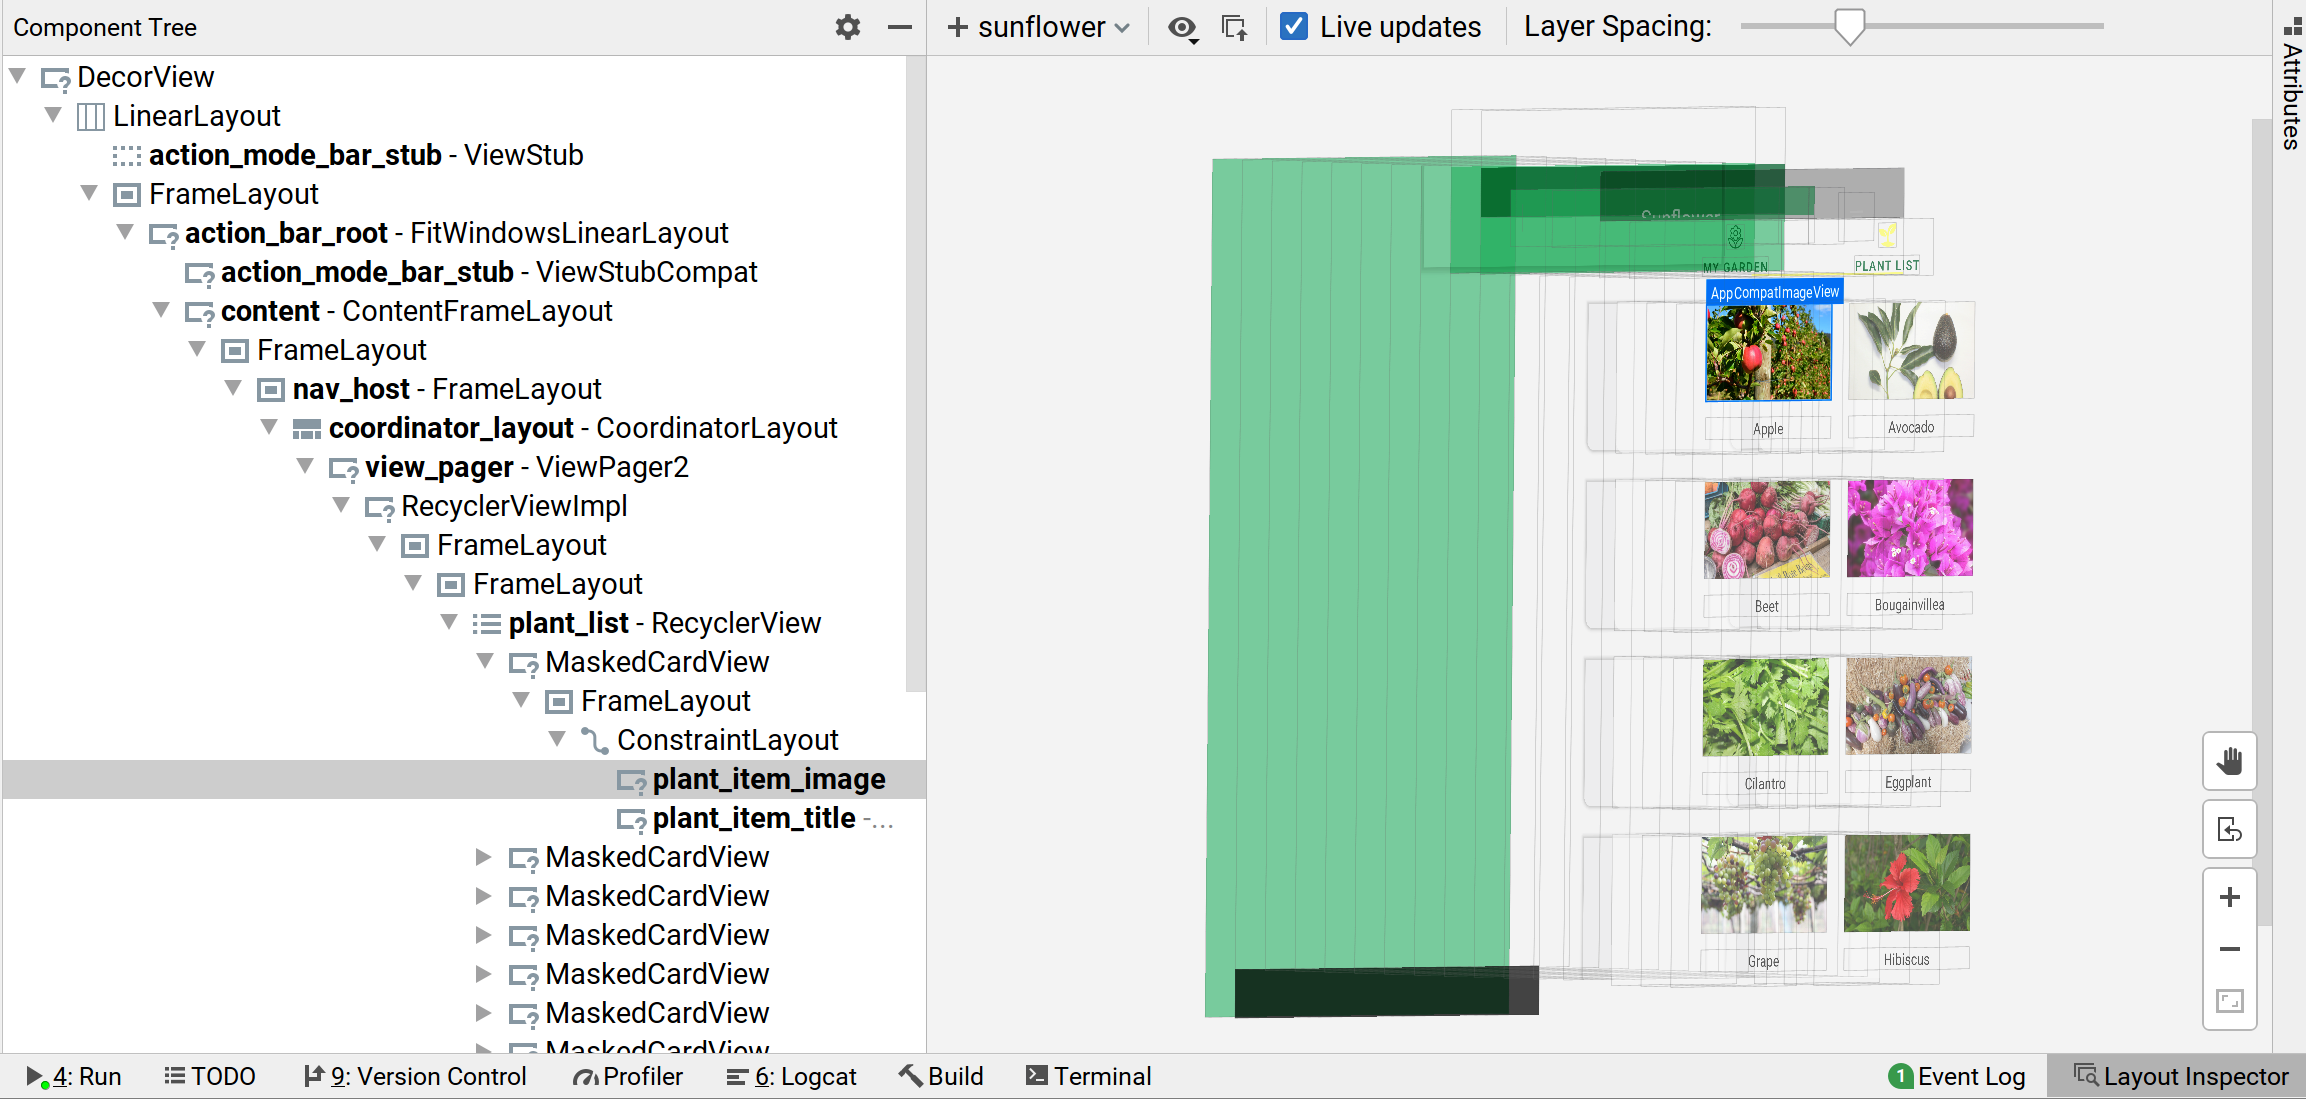
Figure 3. Rotated 3D view of a Layout.
Layout Validation
Layout Validation is a visual tool for simultaneously previewing layouts for unlike devices and display configurations, helping you catch problems in your layouts earlier in the process. To admission this feature, click on the Layout Validation tab in the peak-right corner of the IDE window:
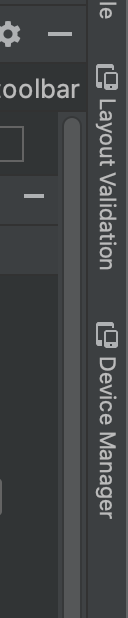
Figure 4. Layout Validation tab.
To switch between the bachelor configuration sets, select one of the following from the Reference Devices dropdown at the top of the Layout Validation window:
- Reference Devices
- Custom
- Color Blind
- Font Sizes
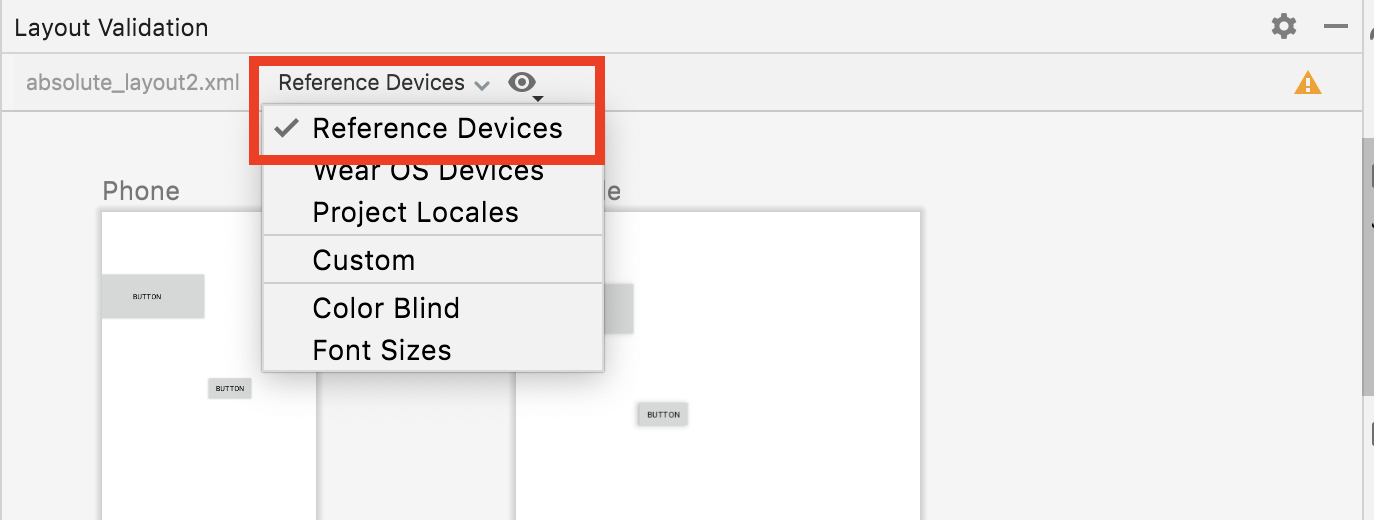
Figure 5. Reference Devices dropdown menu option.
Reference Devices
Reference devices are a prepare of devices that we recommend you test against. They include phone, foldable, tablet, and desktop interfaces. You should preview how your layout appears on this set of reference devices:
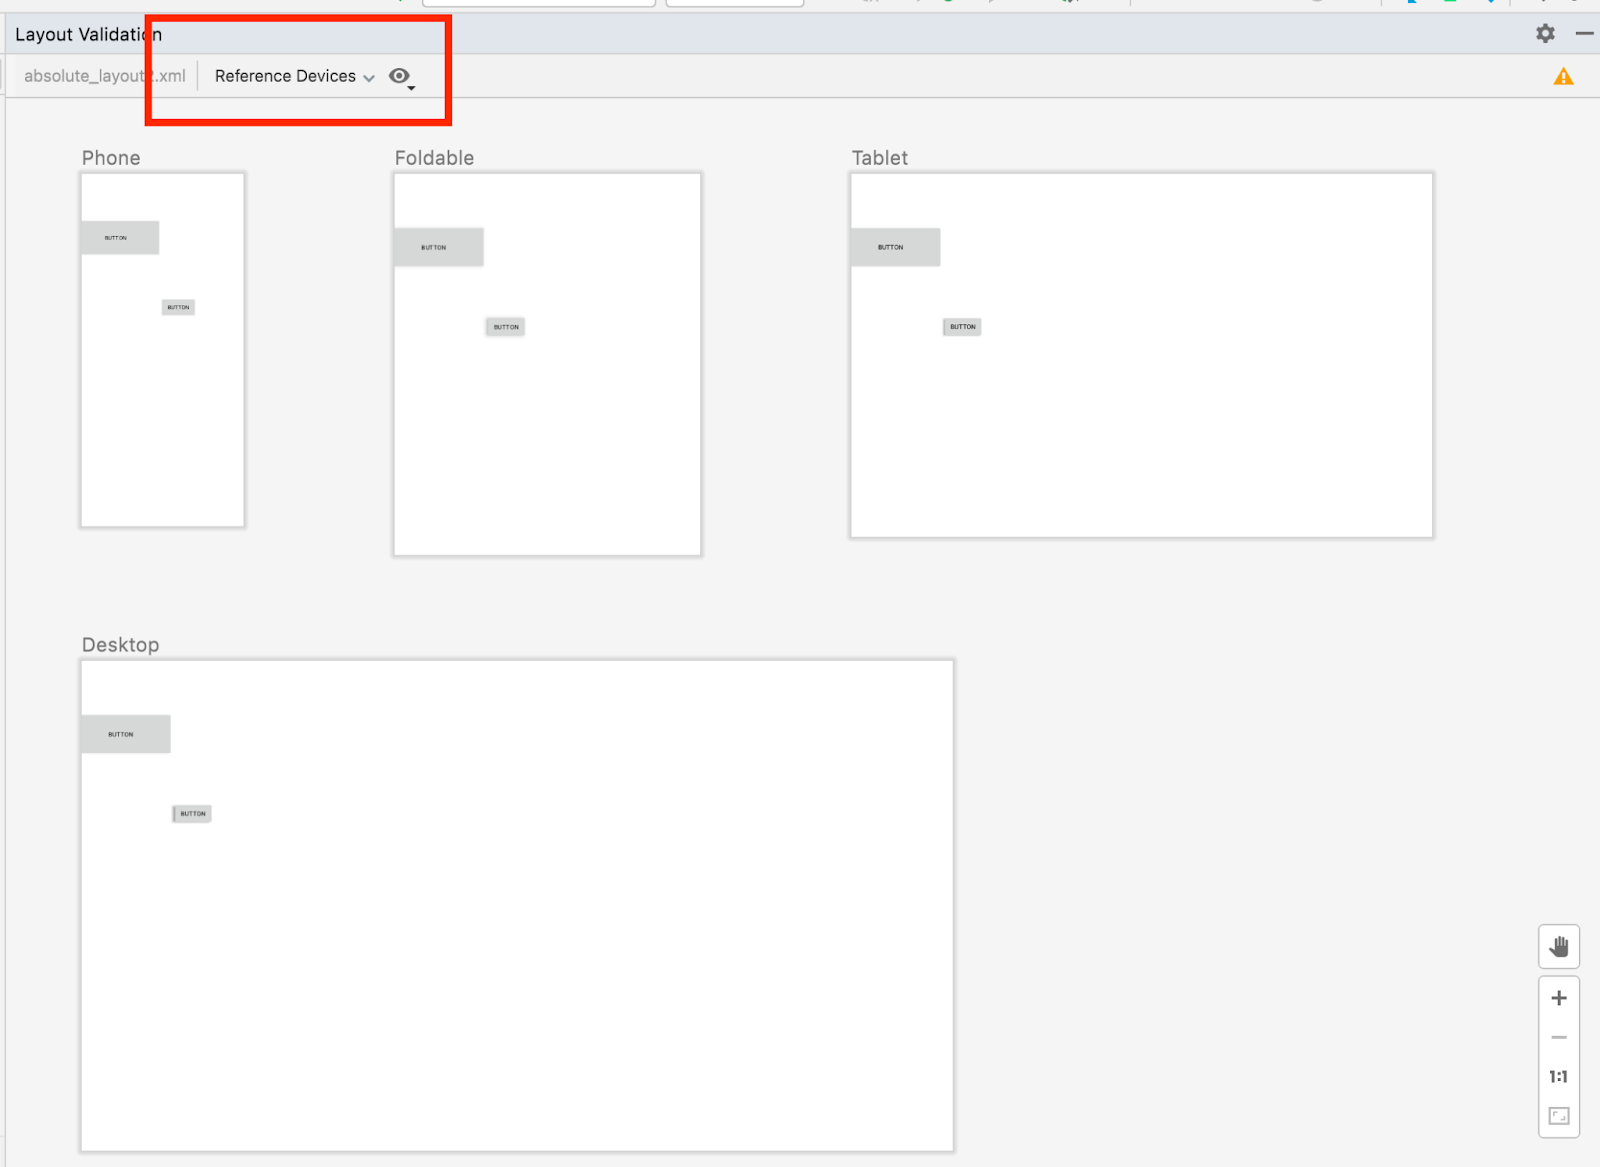
Figure 6. Reference device previews in the Layout Validation tool
Custom
To customize a display configuration to preview, choose from a diverseness of setings including language, device, or screen orientation:

Figure 7. Configure a custom display in the Layout Validation tool
Color Blind
To help make your app more accessible for users who are color blind, validate your layout with simulations of common types of colour incomprehension:
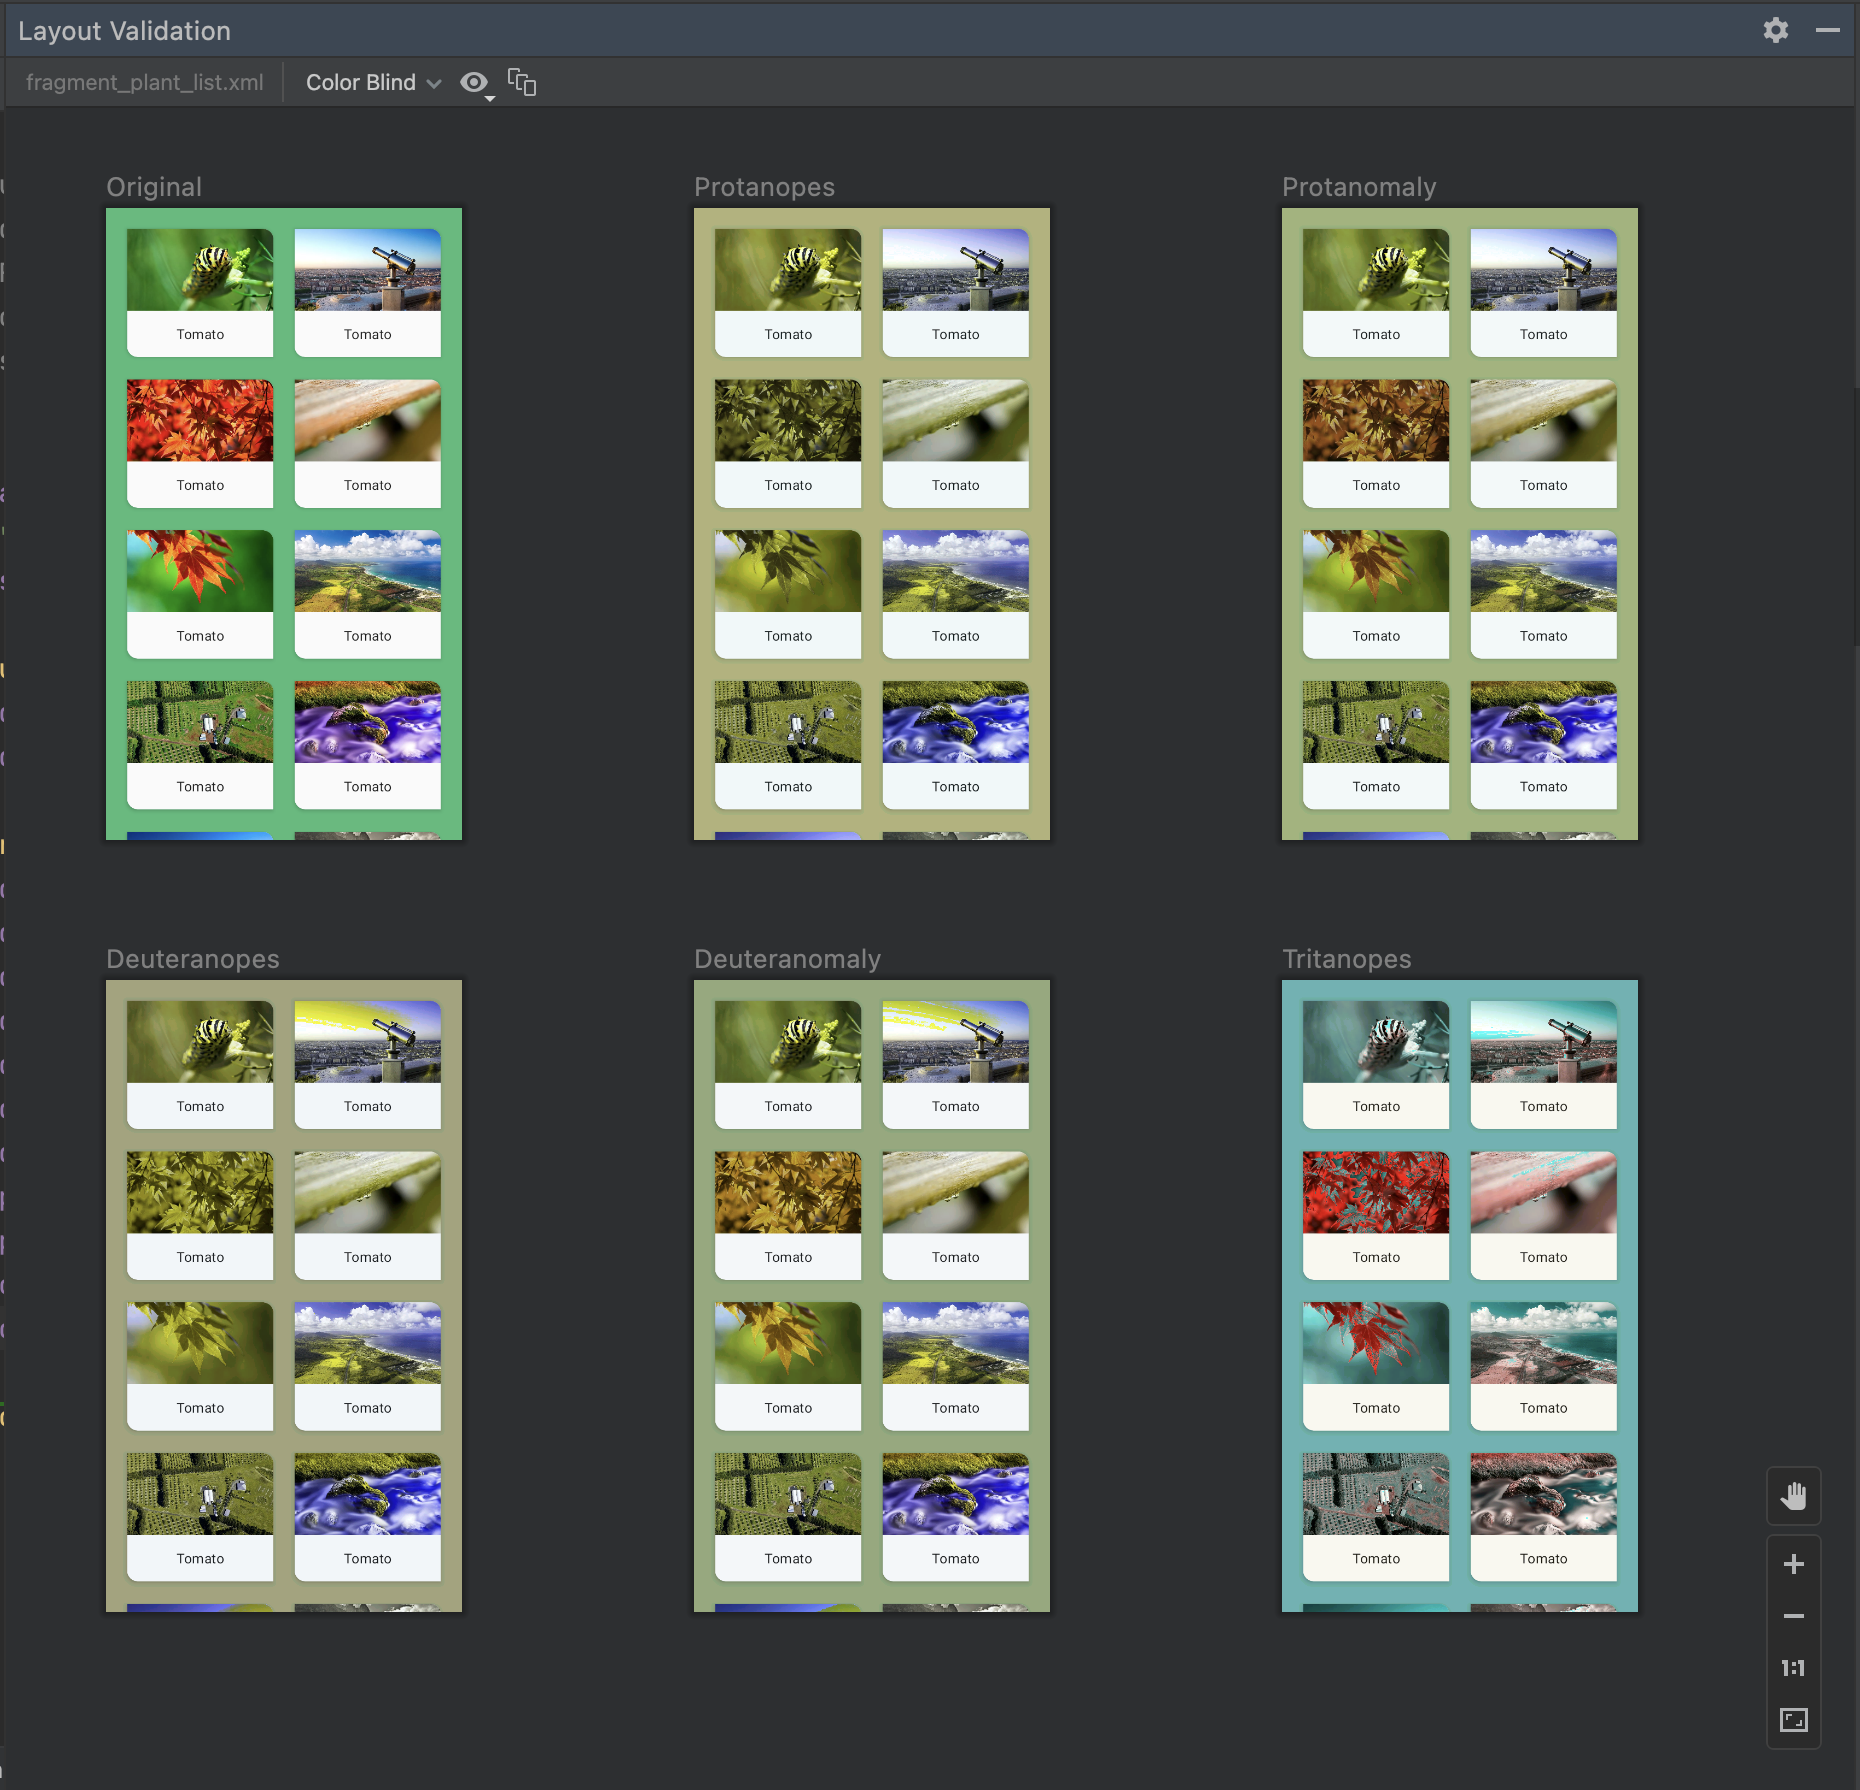
Effigy eight. Color incomprehension simulation previews in the Layout Validation tool
Font Sizes
Validate your layouts at diverse font sizes, and ameliorate your app's accessibility for visually impaired users past testing your layouts with larger fonts:
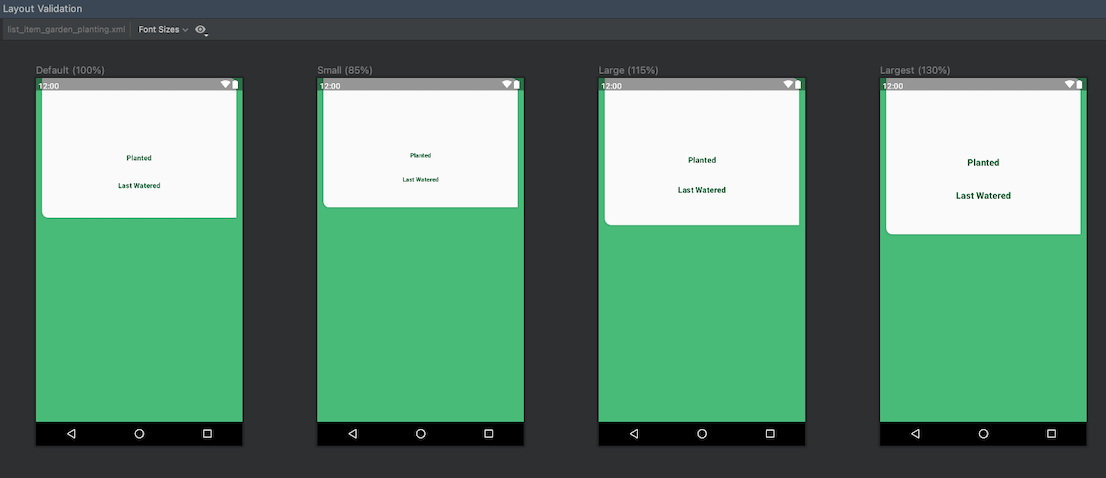
Figure 9. Variable font size previews in the Layout Validation tool
Capture layout hierarchy snapshots
Layout Inspector allows you to save snapshots of your running app's layout hierarchy, so that you lot can easily share them with others or refer to them subsequently.
Snapshots capture the data you would typically see when using the Layout Inspector, including a detailed 3D rendering of your layout, the component tree of your View, Compose, or hybrid layout, and detailed attributes for each component of your UI. To save a snapshot, do the post-obit:
- Open the layout inspector.
- The Layout Inspector should connect to your app process automatically. If not, select the app process from the dropdown menu.
- When you desire to capture a snapshot, click Export snapshot
 from the Layout Inspector toolbar.
 - In the system dialog that appears, specify the proper noun and location y'all want to save your snapshot. Brand certain to save the file with a
*.liextension.
You can then load a Layout Inspector snapshot past selecting File > Open from the principal carte du jour bar, and opening a *.li file.
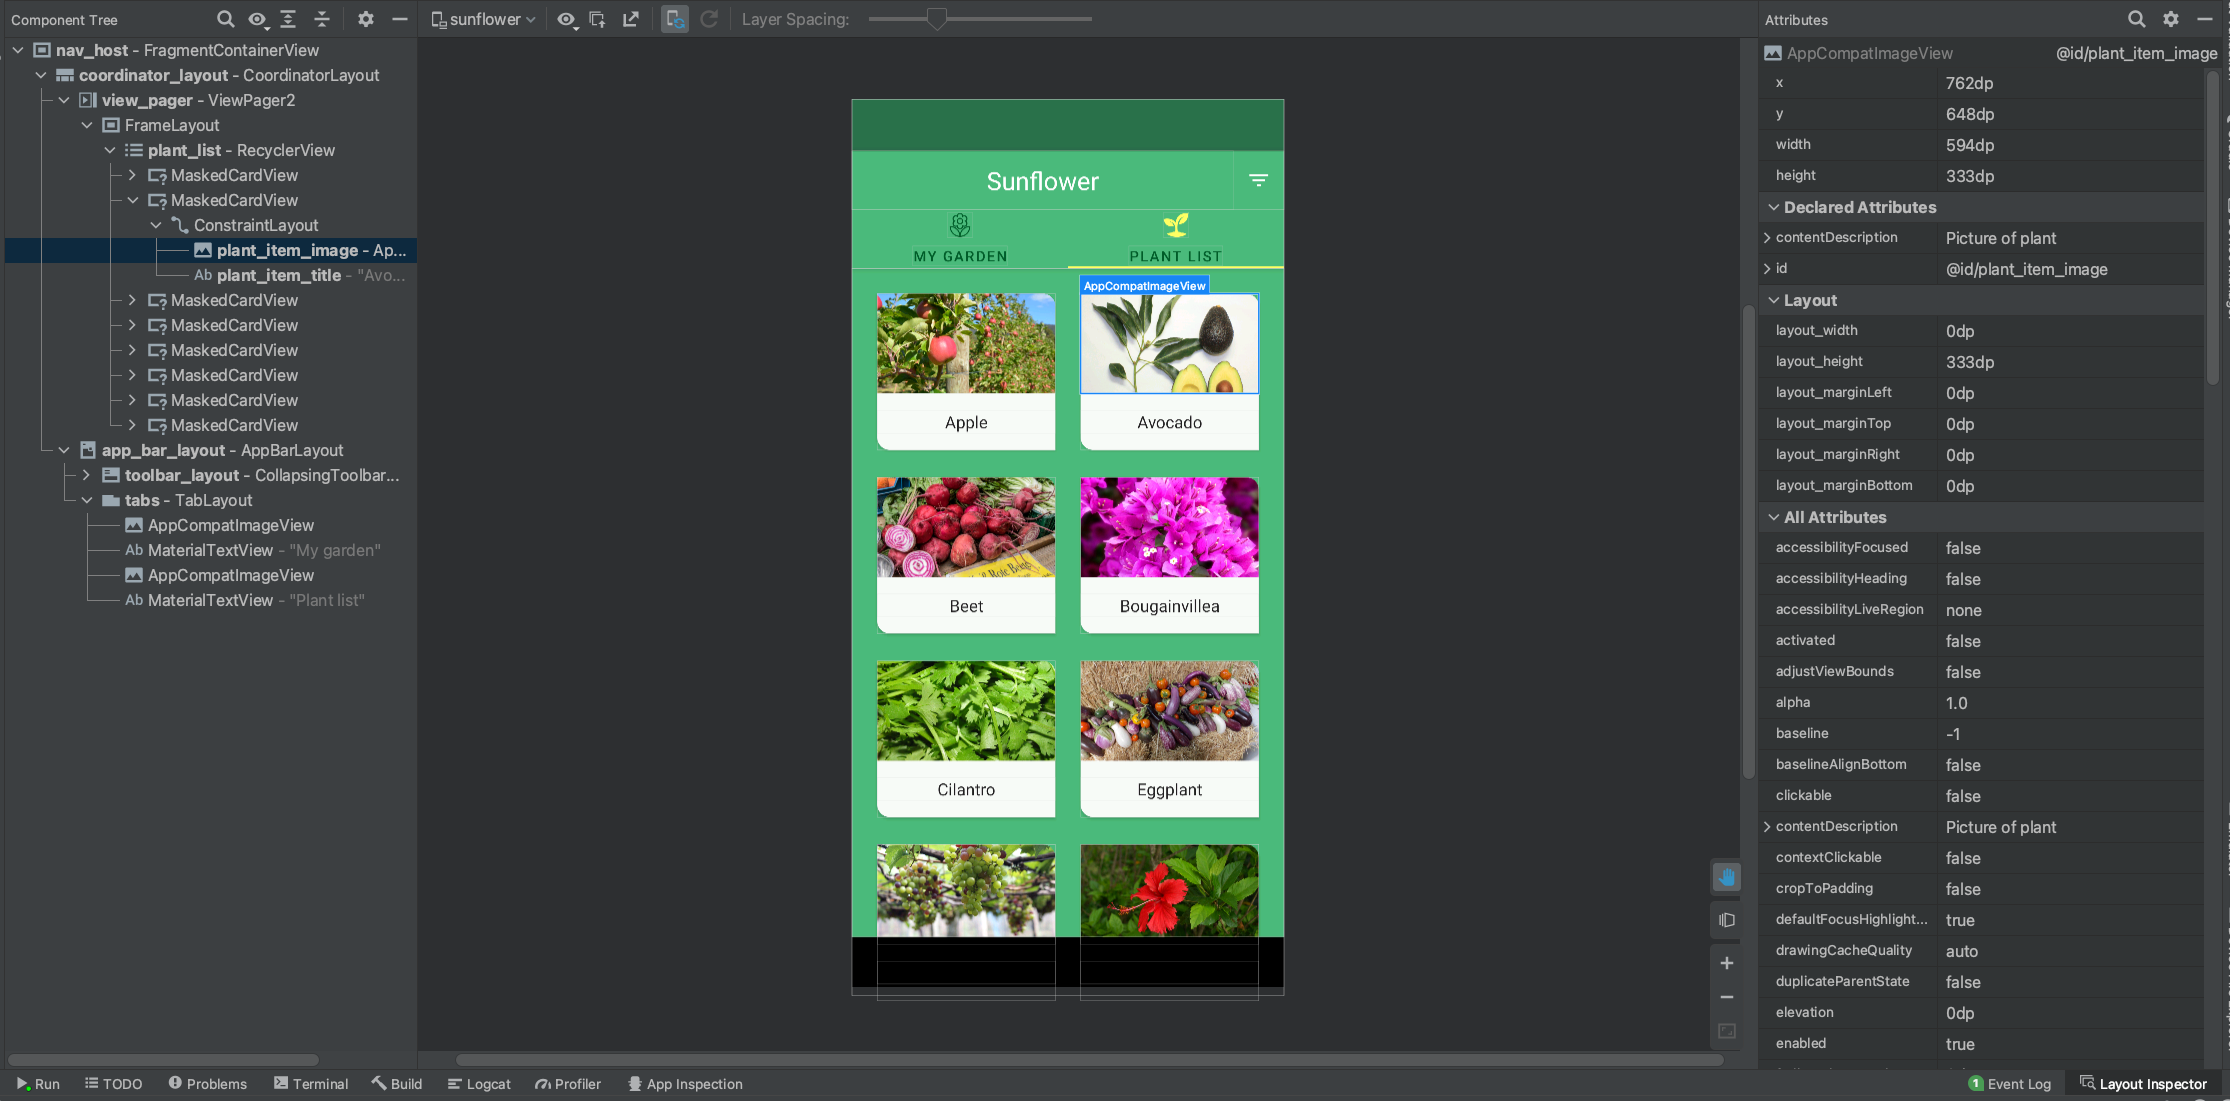
Figure 10. Layout Inspector snapshot for the Sunflower sample app.
Inspect Compose semantics
In Etch, Semantics draw your UI in an alternative manner that is understandable for Accessibility services and for the Testing framework. Y'all tin use the Layout Inspector to inspect semantic information in your Compose layouts.

Effigy eleven. Semantic information displayed using the Layout Inspector.
When selecting a Compose node, use the Attributes window to bank check whether information technology declares semantic information straight, merges semantics from its children, or both. To apace place which nodes include semantics, either declared or merged, utilise select the View options dropdown in the Component Tree window and select Highlight Semantics Layers. This highlights only the nodes in the tree that include semantics, and you tin utilize your keyboard to quickly navigate between them.
dickensoffirest53.blogspot.com
Source: https://developer.android.com/studio/debug/layout-inspector
0 Response to "How to Get Rid of the Attribute Blue Box in Android Studio"
Post a Comment